In Sandbox Survey I, x, y, and z coordinates were collected from a man-made terrain in a sandbox plot (Fig. 1). The purpose was to utilize one of the sampling techniques for large areas to collect data. Data Normalization is adjusting values to a common scale so that they can be worked with. The data points collected from the sandbox survey needed to be normalized in order to show realistic differences in depth and to be interpolated into ArcGIS for further analysis.
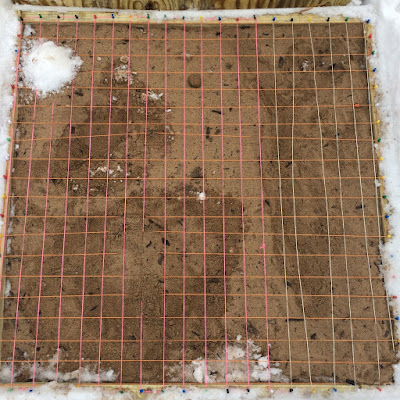 |
Figure 1. The sandbox plot with coordinate grid and man-made terrain.
|
Methods
For organizational purposes, a new geodatabase was created
as a place to keep all of the raster files interpolated into ArcMap. After the
data containing the Z values was normalized in Excel, it was imported as an XY
data table in ArcCatalog. It was then brought into ArcMap as a point feature
class, exported as a layer file, and added to the geodatabase in order to be
opened in ArcScene (Fig. 2). When data is brought into ArcMap like this, it is
important to export it as a layer file so that it is permanent and can be
worked with. The point feature class "brought the data to life" and
was then ready to be turned into a continuous surface using the various
interpolation techniques described below.
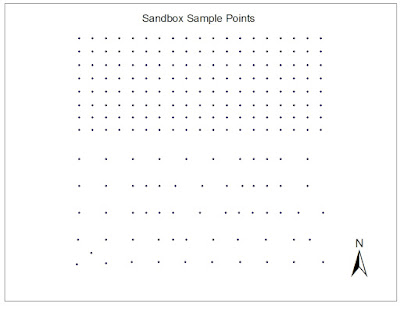 |
| Figure 2. XYZ sample points represented as a points feature class in ArcMap |
IDW: Inverse Distance Weighted interpolation determines
cell values by assuming that points which are close to each other are more
alike than they are with points further away from them. It gives greater weight
to the sample points surrounding the cell and less weight to the sample points
further from the cell. The advantage of this method is that it is usually
quite accurate. The disadvantage, however, is that it cannot generate estimated
points higher than the highest sample point or lower than the lowest sample
point, so random sampling makes it easy for this method to become inaccurate.
(ArcGIS Help)
Natural Neighbors: this method applies weights to the
nearest subset of sample points based on their proportionate areas. It is
different from the IDW method because it only uses a subset of surrounding
points, instead of using all of the sample points. A pro for this method is
that it works well with both regularly distributed data as well as irregularly
distributed data, but a con is that like the IDW method, it cannot generate
estimated points beyond the range of the sampled points. (ArcGIS Help)
Kriging: creates a surface based on spatial
arrangement of surrounding values or using mathematical formulas to determine
statistical relationships between measured points. The mathematical formulas
help to eliminate inaccuracies, however it is difficult to know which formula
would work best for the data at hand without prior knowledge of complex math
and statistics. (ArcGIS Help)
Spline: creates a smooth surface passing through all
measured points using a mathematical function to estimate missing values. This
method is able to observe trends and create highs and lows that may not have
been actually sampled, but if values are close together but have drastically
differing values, this method struggles. (ArcGIS Help)
TIN: this method uses a tool which turns raster
points into a Triangular Irregular Network. The edges of these triangles
capture the position of things like ridge lines or streams. TIN works best for
data sets with a high sample size in areas with large variation in elevation.
This method can estimate pretty much any unknown point, however it is known to
be the least reliable of these 5 interpolation methods.
The 3D scene images of each interpolation method were
exported as jpegs in order to be used in a map layout. This made the images
easily transferrable into ArcMap to compare next to the 2D images. The orientation
of the 2D images was decided to be the same orientation of the photo of the
sandbox plot in Sandbox Survey I to prevent confusion (Fig. 1) The orientation
of the 3D images was the same as that of the 2D images for proper comparison. A
scale bar was used to ensure that each map is in the same scale and therefore
can easily be compared with each other. Scale and orientation are important for
interpreting such maps because the disproportion of the 3D maps may cause the
2D maps to appear larger or smaller than they truly are.
Results & Discussion
The IDW interpolation method produced an average-looking representation of the sandbox terrain (Fig. 3). The surface appeared very bumpy, however it did represent each of the points that were sampled. Each of the man-made geographical features is visible in this map, however the ridge and the hill appear to have points when in reality they should be smooth. The flat plain is represented smoothly here.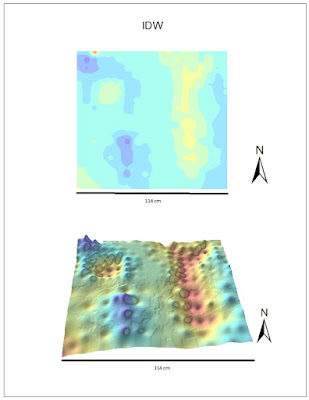 |
| Figure 3. IDW interpolation method. Top map shows the 2D depiction of sandbox plot, bottom map shows 3D depiction. Scale bar on bottom represents length of plot. |
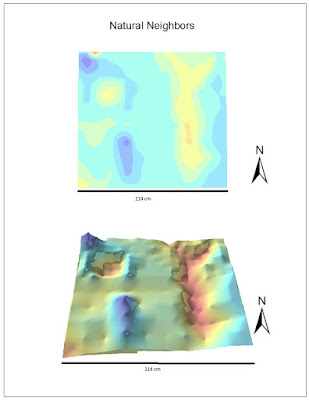 |
| Figure 4. Natural Neighbors interpolation method. Top map shows the 2D depiction of sandbox plot, bottom map shows 3D depiction. Scale bar on bottom represents length of plot. |
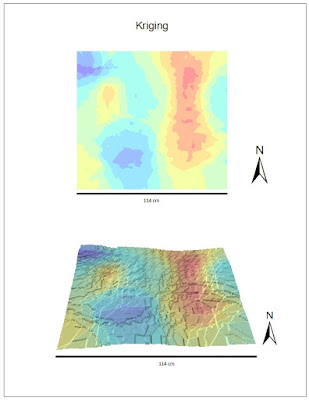 |
| Figure 5. Kriging interpolation method. Top map shows the 2D depiction of sandbox plot, bottom map shows 3D depiction. Scale bar on bottom represents length of plot. |
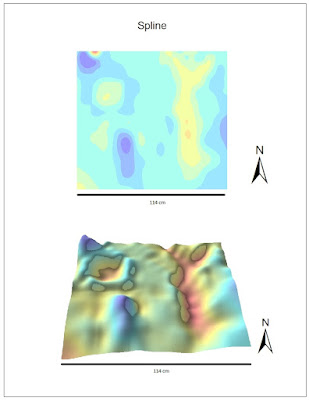 |
| Figure 6. Spline interpolation method. Top map shows the 2D depiction of sandbox plot, bottom map shows 3D depiction. Scale bar on bottom represents length of plot. |
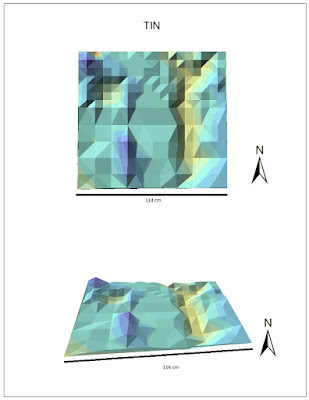 |
| Figure 7. TIN interpolation method. Top map shows the 2D depiction of sandbox plot, bottom map shows 3D depiction. Scale bar on bottom represents length of plot. |
Each of these interpolation methods provided a 3D image of the sandbox plot containing a ridge, valley, plain, depression, and hill. This shows that enough data points were sampled to ensure that each land feature was recognized and the "gaps" were able to be filled in. If this lab were to be repeated, it could be said that even less sample points might be taken because these interpolation tools do a very good job of estimating landscape and depth. The accuracy of these techniques, however, is dependent on the sample data and it is important to have a solid sampling strategy from the start.
Summary & Conclusions
This survey is similar to other field based surveys because
it requires strategic sampling of measured values from a large area. The
concept is the same in that a limited amount of data is used to represent a
larger area. However, it is different because in this field survey the values were
measured by human instead of a computer or device of some sort, so there is
much room for human error. It is not always realistic to perform a detailed
grid-based survey because there are limitations on time, money, equipment,
weather, and workers. All of these factors play a heavy role in determining the
type of field survey to be used. Interpolation methods can be used for
continuous data or things that are generally spatially-based. This includes
things like temperature, rainfall, chemical composition, noise level, and
others.
Resources
ArcHelp desktop
Previous GIS student blogs (Paul Cooper and Rachel Hopps)
Esri Help
http://planet.botany.uwc.ac.za/nisl/GIS/spatial/chap_1_11.htm
No comments:
Post a Comment